Melt-in-Your-Mouth Crescent Cookies (or Ghraybeh/Polvorón): The Timeless Treat! ✨
Melt-in-Your-Mouth Crescent Cookies (or Ghraybeh/Polvorón): The Timeless Treat! ✨
(Estimated Read Time: 3 minutes – Prep Time: 15 minutes – Chill Time: 30 minutes – Bake Time: 15 minutes – Makes: About 30-35 cookies)
There is something truly magical about a cookie that dissolves instantly on your tongue, leaving behind a whisper of sweetness and rich, buttery flavor. These gorgeous, snow-dusted cookies are a testament to the fact that sometimes, the simplest treats are the most satisfying. Known across cultures as Ghraybeh or Polvorón, these classic shortbread-style cookies are incredibly easy to make, require minimal ingredients, and are always a showstopper at holidays or special gatherings.
With their perfectly pale color and soft, crumbly interior (often hiding a little secret nut inside!), they are pure elegance on a plate. Forget complicated baking—get ready to master this timeless recipe and watch the compliments (and likes!) roll in!
What You’ll Need: The Simple Ingredients for Perfection
The secret to this cookie’s texture is the careful balance of fat and flour. We’re keeping it traditional and straightforward.
The Cookie Dough:
1 cup (2 sticks or 225g) Unsalted Butter, softened to room temperature (It must be very soft!)
1/2 cup (100g) Powdered Sugar (Also known as Icing Sugar or Confectioners’ Sugar), plus extra for dusting
1 teaspoon Vanilla Extract (or Vanilla Bean Paste for deeper flavor)
2 cups (240g) All-Purpose Flour (or a mixture of half AP and half Semolina flour for an authentic Middle Eastern texture, as Ghraybeh often uses)
1/2 teaspoon Salt
2 tablespoons Cornstarch (optional, but helps achieve that incredible tenderness)
30-35 Whole Almonds, Pine Nuts, or Pistachios (one for the center of each cookie – optional, but highly recommended!)
For the Snow Dusting:
1/2 cup Powdered Sugar
1 teaspoon Cornstarch (to prevent clumping)
👩🍳 The Process: Creating the Perfect Crumbly Cookie
Achieving that signature “melt-in-your-mouth” texture is all about gentle mixing and proper chilling.
Step 1: The Creaming Stage
In a large mixing bowl, using an electric mixer (handheld or stand mixer), beat the softened butter until it is light and creamy—this might take 2 to 3 minutes. The butter needs to be pale and fluffy. Gradually add the 1/2 cup of powdered sugar and the vanilla extract. Continue beating on medium speed until the mixture is beautifully smooth and airy. Remember to scrape down the sides of the bowl often!
Step 2: Incorporate the Dry Ingredients
In a separate bowl, whisk together the flour, salt, and cornstarch (if using). This ensures the ingredients are evenly distributed. Now, switch your mixer to low speed or use a wooden spoon. Gradually add the dry mixture to the butter mixture. Mix just until the flour is fully incorporated and a soft, workable dough forms. Do not overmix! Overmixing will develop the gluten and result in a tough cookie, which is the opposite of what we want.
Step 3: Chill and Preheat
Gather the dough into a ball, cover it, and place it in the refrigerator for at least 30 minutes. This chilling time is essential for the dough to firm up, making it easier to handle and preventing the cookies from spreading too much while baking. While the dough is chilling, preheat your oven to 325°F (160°C) and line two baking sheets with parchment paper.
Step 4: Shaping the Snowballs
Remove the dough from the fridge. Scoop out small portions (about 1 tablespoon each) and roll them gently into smooth, round balls. For that classic look, you can also roll them into a crescent shape! If you are using a whole nut, press one into the center of each cookie ball. Place the shaped cookies onto the prepared baking sheets, leaving a little space between them.
Step 5: The Gentle Bake
Bake the cookies for 15 to 18 minutes. These cookies are meant to stay very pale; you do not want them to brown. They are done when the bottom edges look just set and the tops are still soft and mostly white.
Step 6: The Signature Dusting
Remove the cookies from the oven and let them cool on the baking sheet for about 5 minutes, as they will be very fragile when hot. Carefully transfer them to a wire rack to cool completely.
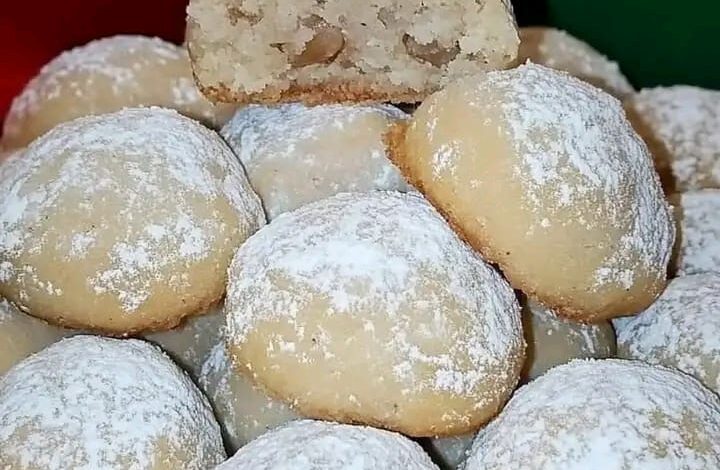
Once fully cooled, whisk together the extra powdered sugar and cornstarch for the final dusting. Sift a generous layer of this mixture over the cookies. You can also toss them gently in a shallow bowl of the powdered sugar mixture for full coverage, creating that beautiful “snowball” effect you see in the picture!
Arrange your finished, snow-dusted cookies on a pretty platter, snap a photo, and get ready for a flood of likes! Enjoy!