🌟 The Ultimate Creamy Dreamy Chia Seed Pudding: Your New Morning Obsession! 🌟
🌟 The Ultimate Creamy Dreamy Chia Seed Pudding: Your New Morning Obsession! 🌟
Are you tired of rushing through your mornings with nothing but a cup of coffee? ☕️ Do you want a snack that satisfies your sweet tooth while fueling your body with Omega-3s, fiber, and protein? 🔋 Say hello to the Creamy Coconut & Vanilla Chia Pudding! 🥥🍨
This recipe is viral-worthy because it’s ridiculously simple, totally customizable, and looks absolutely stunning in those aesthetic glass jars. Once you master the “Magic Ratio,” you’ll never go back to boring cereal again! 🥣🚫
🛒 The Ingredients (The Golden Ratio)
To get that thick, luscious texture seen in the photo (no watery pudding here!), you’ll want to follow these specific dosages for a batch of 3 generous jars:
2 Cups of Unsweetened Coconut Milk: You can also use Almond, Oat, or Soy milk! 🥛 For the extra-creamy texture in the photo, a mix of half-canned coconut milk and half-carton milk works wonders.
1/2 Cup of Black Chia Seeds: These tiny powerhouses are what create that “caviar” texture we love. 🌑✨
3 tbsp Pure Maple Syrup or Agave: Adjust this to your liking, but this gives it a natural, floral sweetness. 🍁
1 tsp Pure Vanilla Extract: Don’t skip this! It makes the pudding taste like a melted vanilla milkshake. 🍦
A Pinch of Sea Salt: Just a tiny bit to balance the sweetness and bring out the flavors. 🧂
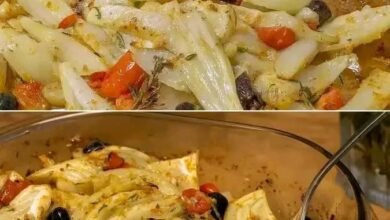
Fresh Toppings: Based on the photo, a little swirl of strawberry jam or fresh berries at the bottom adds that beautiful pop of color! 🍓🍊
👩🍳 The Step-by-Step Magic Process
1. The Big Mix 🥣
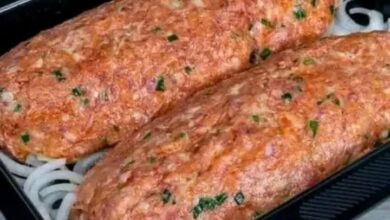
In a large mixing bowl (just like the one in the top photo!), pour in your milk of choice. Slowly whisk in your maple syrup, vanilla, and that tiny pinch of salt. Make sure the sweetener is fully dissolved so every bite is equally delicious.
2. The “Chia Rainfall” 🌧️
Slowly pour your 1/2 cup of chia seeds into the liquid. Pro Tip: Don’t just dump them in! Sprinkle them across the surface while whisking constantly. This prevents the seeds from clumping together into “chia bricks.” 🧱❌
3. The Double-Whisk Technique ⏳
This is the most important step for social-media-perfect pudding! Whisk the mixture for 2 minutes straight. Then, let it sit on the counter for 5-10 minutes. During this time, the seeds start to absorb liquid. Give it one more vigorous whisk after those 10 minutes. This ensures the seeds are perfectly suspended and don’t all sink to the bottom!
4. The Jar Prep 🏺
Grab your clean glass jars. If you want that cute red streak seen in the photo, drop a teaspoon of strawberry or raspberry puree into the bottom or side of the jar before pouring. Carefully ladle the chia mixture into the jars, leaving about half an inch of space at the top.
5. The Big Chill ❄️
Seal the lids tightly and place them in the refrigerator. For the best results, let them set for at least 4 hours, but overnight is where the real magic happens! The seeds will expand to 10x their size, turning the liquid into a thick, spoonable custard. 🥄💎
✨ Why Everyone is Liking This Recipe
No-Cook Wonder: No stove, no mess, no stress. It’s the ultimate “lazy” gourmet meal. 😴
Gut Health Hero: Chia seeds are incredible for digestion and keep you full until lunch! 🌿💪
Dessert for Breakfast: It’s basically a healthy panna cotta. Who doesn’t want that? 🍮
Infinite Variations: Swap vanilla for cocoa powder for a chocolate version, or top with those oranges in the background for a “Creamsicle” vibe! 🍊🍦
💡 Pro Tips for Viral Success
The Texture Check: If your pudding is too thin after 4 hours, whisk in an extra tablespoon of seeds. If it’s too thick, add a splash more milk! 🥛✨
Layering: For the best photos, layer the pudding with granola, nut butter, or fresh mango. 🥭📸
Would you like me to give you five amazing flavor variations you can try with this base recipe?