✨ The Ultimate Heavenly Vanilla Star Shortbreads ✨
There is something truly magical about a kitchen filled with the scent of warm butter and sweet vanilla. Whether you are prepping for a festive holiday, a cozy weekend, or just because you deserve a celestial treat, these Heavenly Vanilla Star Shortbreads are the answer. 🌟
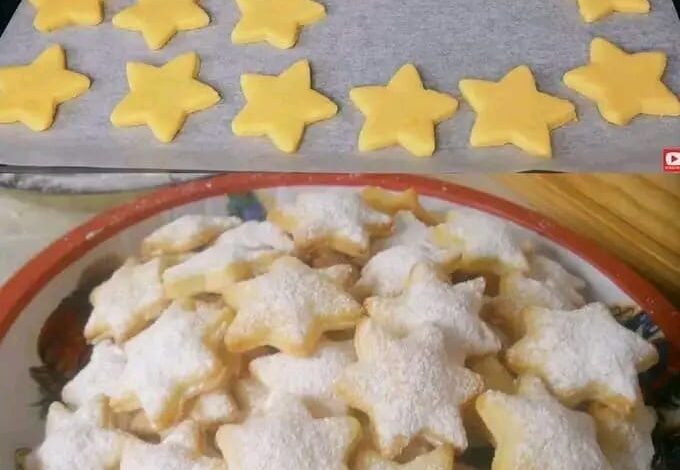
These aren’t just your average cookies; they are delicate, melt-in-your-mouth masterpieces that look like they fell straight from the night sky. With their crisp edges and snowy powdered sugar coating, they are as beautiful to look at as they are delicious to eat! ☁️🍪
🛒 The Golden Ingredients
To create these starry delights, you’ll need a few simple, high-quality ingredients. The secret is in the temperature of your butter—make sure it’s just right! 🧈
All-Purpose Flour: 2 ½ cups (320g) – Sifted for that extra light texture. 🌾
Unsalted Butter: 1 cup (225g) – Softened to room temperature (this is the soul of the cookie!). 🧈
Powdered Sugar: ¾ cup (90g) – For the dough, plus extra for the “snowy” finish. ❄️
Egg Yolk: 1 large – This adds that rich, golden crumbly texture. 🥚
Vanilla Extract: 2 teaspoons – Use the good stuff; your taste buds will thank you! ✨
Cornstarch: 2 tablespoons – Our secret weapon for a “melt-away” feel. 🥄
Salt: A tiny pinch – To balance the sweetness. 🧂
👩🍳 The Step-by-Step Magic
1. Creaming to Perfection 🥣
Start by placing your softened butter and powdered sugar in a large mixing bowl. Using a hand mixer or a stand mixer, cream them together until the mixture looks pale, fluffy, and cloud-like. This usually takes about 3 to 5 minutes. Don’t rush this step—air is your friend! 🌬️
2. Adding the Essence 🥚
Add in your single egg yolk and the vanilla extract. Mix again until fully combined. You’ll notice the dough becoming silky and fragrant. 🌸
3. The Dry Marriage 🌾
In a separate bowl, whisk together your flour, cornstarch, and salt. Gradually add the dry ingredients to the buttery mix. Turn your mixer to the lowest setting or use a spatula. Mix just until the dough comes together. Pro-tip: Over-mixing leads to tough cookies, and we want these to be tender stars! 🌠
4. The Chill Factor 🧊
Form the dough into a flat disc, wrap it tightly in plastic wrap, and let it rest in the fridge for at least 30 to 60 minutes. Chilling the dough prevents the cookies from spreading in the oven, keeping those star points nice and sharp! 🔪⭐
5. Rolling & Cutting 📜
Preheat your oven to 350°F (175°C). Roll out your chilled dough on a lightly floured surface (or between two sheets of parchment paper) until it’s about ¼ inch thick. Take your favorite star-shaped cutter and stamp out your celestial army! 🌌
6. The Golden Bake 🔥
Line a baking sheet with parchment paper and arrange your stars with a little space between them. Bake for 10–12 minutes. You aren’t looking for dark brown edges—these should remain pale and delicate, just barely golden on the very bottom. ⏲️
7. The Snowy Finish ❄️
Let the cookies cool on the tray for 5 minutes before moving them to a wire rack. While they are still slightly warm (but not hot!), use a fine-mesh sieve to shower them in a thick layer of powdered sugar. This creates that magical, velvety coating seen in the photo! 🌨️✨
💡 Baker’s Tips for Success
Butter Temperature: If your butter is too oily/melted, the dough will be sticky. If it’s too cold, it won’t cream properly. Aim for “dentable” but not “shiny.” 🧈
Storage: These stars stay fresh in an airtight container for up to a week—if they last that long! They actually taste even better the second day as the vanilla deepens. 🏺
Customization: Feel free to add a zest of lemon or orange to the dough for a citrusy twist! 🍋
Enjoy your homemade galaxy of flavor! These are perfect for gifting, tea parties, or late-night snacking under the actual stars. 🌠☕
Would you like me to help you adjust these measurements for a larger batch or perhaps suggest a vegan alternative for this recipe?