🥖 I Don’t Buy Bread Anymore! No Kneading, No Eggs, No Butter: The Easiest & Cheapest Homemade Bread Ever! 🥖
🥖 I Don’t Buy Bread Anymore! No Kneading, No Eggs, No Butter: The Easiest & Cheapest Homemade Bread Ever! 🥖
Stop wasting your money on store-bought loaves filled with preservatives and “mystery” ingredients! 🚫 If you think baking bread is a complex science that requires expensive mixers or professional skills, I am here to change your life forever. This recipe is the ultimate game-changer. It’s the “lazy” way to achieve a professional, bakery-style crust and a soft, airy interior that will make your kitchen smell like a dream. 🏠✨
This is the purest form of bread. We are talking about 4 simple pantry staples. No eggs to beat, no butter to melt, and absolutely zero kneading. You won’t even get your hands messy! Just a bowl, a spoon, and a little bit of patience. Whether you are a total beginner or a seasoned pro looking for a “set it and forget it” recipe, this is the only bread guide you will ever need. 🍞🔥
🛒 The Simple Ingredients (Pantry Staples!)
You probably have everything you need in your kitchen right now. This recipe is designed to be budget-friendly and incredibly accessible. 💸
3 Cups (375g) All-Purpose Flour: (You can also use Bread Flour for a slightly chewier texture, but regular flour works perfectly!) 🌾
1 ½ Cups (355ml) Warm Water: Not hot! It should feel like a warm bath (around 100°F – 110°F). If it’s too hot, you’ll kill the yeast; too cold, and it won’t wake up. 🌡️
1 Teaspoon Active Dry Yeast: The little engine that makes it all happen! 🦠
1 Teaspoon Salt: For that essential savory flavor balance. 🧂
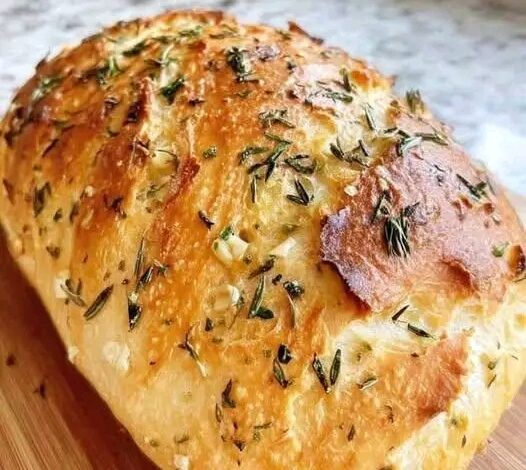
Optional Topping: Fresh Rosemary and a drizzle of Olive Oil (to get that gorgeous look from the photo!) 🌿
👩🍳 The Foolproof Process (Step-by-Step)
1. The “Lazy” Mix 🥣
In a large mixing bowl, whisk together your flour, yeast, and salt. Make a well in the center and pour in the warm water. Using a wooden spoon or a spatula, stir everything together until a shaggy, sticky dough forms and no dry flour remains. Do not knead! Just mix it until it’s combined. It will look a bit messy—that’s exactly what we want!
2. The Big Sleep (The Rise) 😴
Cover the bowl tightly with plastic wrap or a damp kitchen towel. Place it in a warm, draft-free spot in your kitchen. Now, let time do the work for you. Let it rise for at least 2 to 3 hours. If you want even more flavor, you can let it sit for up to 12-18 hours in the fridge! The dough will double in size and become covered in tiny, beautiful bubbles.
3. Shaping Without the Mess ☁️
Preheat your oven to 450°F (230°C). While the oven heats up, place a piece of parchment paper on your counter. Gently scrape the dough out of the bowl and onto the paper. Using floured hands, just tuck the edges under to form a rough oval or round shape. If you want that “Instagram look,” drizzle a little olive oil on top and sprinkle fresh rosemary and a pinch of coarse salt. 🌿✨
4. The Magic of Steam 🌬️
For that crunchy, “shatter-in-your-mouth” crust, we need steam. You can bake this in a Dutch Oven (preheat the pot in the oven first!) or simply place the dough on a baking sheet and put a pan of water on the rack below it.
5. Golden Perfection 🥖
Carefully place the dough (with the parchment paper) into your hot pot or onto the baking tray. Bake for 30 minutes with a lid on (or with the steam pan). Then, remove the lid and bake for another 10-15 minutes until the crust is a deep, golden brown and sounds hollow when you tap the bottom.
💡 Why You Will Never Go Back
Cost Effective: This loaf costs pennies to make compared to the $5-$7 artisanal loaves at the bakery. 💰
Healthier: No hidden sugars, no stabilizers, and no oils. Just pure bread goodness. ❤️
No Equipment Needed: No stand mixer? No bread machine? No problem! All you need is a bowl. 🥣
Impress Your Friends: Serve this warm with some balsamic vinegar and oil, and people will think you took a professional pastry course. 👨🍳🌟
Pro Tip: Resist the urge to cut into the bread immediately! Let it cool for at least 20 minutes so the structure sets. If you cut it too soon, the steam escapes and the bread can become gummy. Trust the process! 🖐️🛑
If you loved this “No-Stress” bread recipe, make sure to hit that LIKE button, SAVE this post for your weekend baking, and TAG a friend who needs to stop buying processed bread! 👇🥖✨
Would you like me to suggest some flavored variations, like garlic-herb or jalapeño-cheddar?