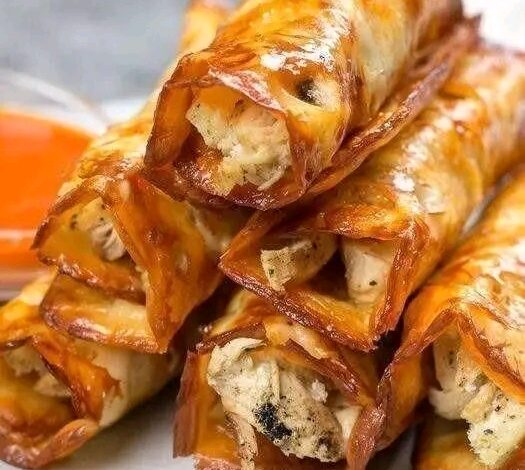
🔥 THE ULTIMATE KETO CRUNCH: 3-INGREDIENT CHEESE-WRAPPED CHICKEN ROLLS 🔥
Are you tired of boring snacks that leave you feeling sluggish? Do you crave that golden, shatter-ingly crispy texture but want to keep your carb count at basically zero? Well, stop scrolling! 🛑 You’ve just stumbled upon the holy grail of low-carb cooking.
These 3-ingredient miracle rolls are taking the internet by storm because they taste like a “cheat meal” but fit perfectly into your fitness goals. Whether you are a total kitchen newbie or a seasoned pro looking for a 10-minute hack, this recipe is for you! 🌟
🕒 WHY YOU WILL OBSESS OVER THIS RECIPE
Let’s be real: we all have those days where we are starving but have zero energy to cook. This recipe is the answer to your prayers. It’s:
Insanely Fast: From fridge to plate in under 10 minutes. ⚡
Protein Packed: Pure chicken and cheese power. 💪
Budget Friendly: No expensive “superfoods” required. 💸
Kid Approved: They won’t even know it’s healthy! 🧒
🛒 WHAT YOU’LL NEED (THE MAGIC THREE)
You don’t need a long grocery list for this one. Just three simple, high-quality ingredients to create a flavor explosion! 💣
Sliced Provolone or Mozzarella Cheese: 6-8 slices (Look for the circular ones, they roll the best!). 🧀
Pre-cooked Shredded Chicken: 1.5 cups (Leftover rotisserie chicken is the secret weapon here!). 🍗
Everything Bagel Seasoning or Italian Herbs: 2 tablespoons (For that gourmet kick). ✨
👩🍳 THE STEP-BY-STEP PROCESS TO CRISPY PERFECTION
Follow these steps closely to get that perfect “cheese-crust” shell!
Step 1: Prep the Pan 🍳
Place a large non-stick skillet over medium heat. You don’t need oil! The cheese provides its own healthy fats to get crispy. Wait until the pan is nice and hot.
Step 2: The Cheese Melt 🧀
Place your cheese slices on the skillet (do 2 or 3 at a time so they don’t crowd). Let them sit until the edges start to turn golden brown and small bubbles form in the center. This “lacey” look is exactly what you want!
Step 3: Stuff It 🍗
Once the cheese is bubbly, place a generous pinch of shredded chicken right down the center of each slice. Sprinkle your seasoning over the chicken.
Step 4: The Golden Roll 🌀
Carefully use a spatula to lift one edge of the cheese. If it’s crispy enough, it should lift easily. Fold it over the chicken and roll it up tight!
Step 5: The Final Crisp 🔥
Let the roll sit on the seam for 30 seconds to “glue” it shut, then remove from the heat. Let them rest for 1-2 minutes—this is crucial! They get crunchier as they cool down.
💡 PRO-TIPS FOR MAXIMUM VIBES
Dipping is Mandatory: Serve these with a side of sugar-free marinara, spicy buffalo sauce, or creamy ranch. 🌶️
The Crunch Factor: If your cheese is still soft, leave it on the pan for 20 more seconds. You want that deep mahogany gold color! 🍯
Meal Prep King: You can make a big batch and pop them in the air fryer for 2 minutes the next day to regain that “snap.” 🌬️
❤️ JOIN THE COMMUNITY
I pour my heart into finding these “lazy-but-healthy” hacks just for you! If you want to keep seeing these life-changing recipes in your feed, I need your support!
PLEASE LIKE THIS POST, SAVE IT FOR LATER, AND DROP A “YUM” IN THE COMMENTS! 👇
Your engagement keeps this page alive and allows me to keep sharing my kitchen secrets with the world. Let’s hit 10,000 likes on this one! 🚀