✨ THE ULTIMATE AIR FRYER FRUIT SCONE REVOLUTION: FLUFFY, GOLDEN & ABSOLUTELY IRRESISTIBLE ✨🍓
✨ THE ULTIMATE AIR FRYER FRUIT SCONE REVOLUTION: FLUFFY, GOLDEN & ABSOLUTELY IRRESISTIBLE ✨🍓
Have you ever dreamed of that perfect, quintessentially British afternoon tea, but didn’t want to heat up the entire house with a massive oven? Well, hold onto your aprons because I am about to drop a culinary bombshell! Today, I’m sharing my secret for the Absolute Best Fruit Scones Ever, and guess what? We are making them right in the Air Fryer! 🌬️🔥
I honestly couldn’t believe my eyes when I pulled these out. They rose like clouds, had that perfect “nooks and crannies” texture, and the golden crust was simply to die for. This is a total game-changer for your weekend brunch or a cozy snack.
🛒 The Golden Ingredient List
To achieve scone perfection, you need quality ingredients. Here is exactly what you’ll need to gather for this magic to happen:
350g Self-Raising Flour (plus a little extra for dusting your work surface)
1 tsp Baking Powder (for that extra-high “wow” lift!)
85g Cold Unsalted Butter (cut into small cubes—keep it chilly!)
3 tbsp Caster Sugar (just the right amount of sweetness)
175ml Whole Milk (room temperature is best here)
100g Sultanas or Raisins (plump and juicy)
1 tsp Vanilla Extract (for that “bakery-style” aroma)
A squeeze of Lemon Juice (the secret trick to reactivate the rise)
1 Egg (beaten, for that shiny, professional egg wash glaze)
A pinch of Salt (to balance the flavors)
👩🍳 The Step-by-Step Magic Process
1. The Flour Foundation 🥣
Start by sifting your self-raising flour, baking powder, and a pinch of salt into a large mixing bowl. Sifting is crucial! It aerates the flour, ensuring your scones aren’t heavy like bricks.
2. The “Breadcrumb” Technique 🖐️
Add those cold cubes of butter. Using your fingertips, gently rub the butter into the flour until the mixture looks like fine breadcrumbs. Work quickly so the heat from your hands doesn’t melt the butter—we want those tiny butter pockets for a flaky finish! Stir in the caster sugar.
3. The Fruit Infusion 🍇
Toss in your sultanas. Make sure they are evenly distributed through the dry mix so every bite is packed with fruity goodness.
4. The Liquid Gold 🥛
Warm your milk slightly in the microwave (just for a few seconds) and add the vanilla extract and a squeeze of lemon. Make a well in the center of your dry ingredients and pour the milk in. Use a cutlery knife to “cut” the liquid into the flour. This prevents overworking the dough!
5. The Gentle Fold 🍞
Once it starts coming together, use your hands to briefly bring it into a soft dough. Transfer to a floured surface. Pro Tip: Do not use a rolling pin! Gently pat the dough down with your hands until it’s about 3cm thick. Cut out your rounds using a fluted cutter.
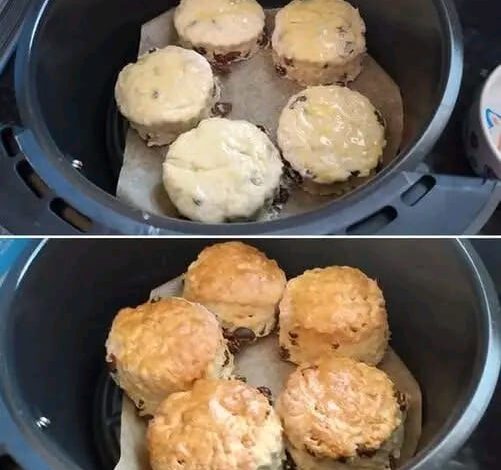
6. The Air Fryer Transformation ✈️
Line your air fryer basket with a small piece of parchment paper (make sure it doesn’t cover the whole bottom so air can still circulate). Arrange your scones inside, leaving a little space between them. Brush the tops generously with your beaten egg wash for that stunning golden glow.
7. The Bake 🕒
Set your air fryer to 180°C and bake for 10 to 12 minutes. Halfway through, you’ll start smelling the heaven! They are done when they are tall, golden-brown, and sound slightly hollow when tapped on the bottom.
💖 A Little Heart-to-Heart…
I put my heart and soul into testing these recipes so you can have a 5-star bakery experience in your own kitchen! If you want to keep seeing these secret Air Fryer hacks and delicious treats, I need your support!
PLEASE LIKE THIS POST, SAVE IT, AND LEAVE A COMMENT BELOW! 👇
Tell me: Do you prefer your scones with Clotted Cream first or Jam first? Let’s start the great debate! Your engagement helps me keep this page alive and cooking! 🍓🧁✨